Wednesday, August 29, 2012

MS WORD अपना मेनू बनाना चाहते है

दोस्तों MS WORD सब लोग इस्तमाल करते है मेनू बार भी सब लोग देखते है ..
लेकिन क्या आप अपना मेनू बनाना चाहते है ..यदि हां तो मुझे बताएं  ..
यदि आपका उत्तर मिला तो पोस्ट करूँगा वरना समझूंगा की सब को आता हैmenu bar


menubar
Click tools click customize
Click On Commands
From Categories
Select New Menu
From Right Panel : New Menu
Drag It To Menu Bar
Right Click and Type The Name Of Menu
Select Your Max Use Option from left panel and drag to New Built Menu
Now Close the window
And Your Menu Is in Your Menu Bar
Creating Menu Bar Using Ms Office

पेन ड्राइव को बूटेबल


पेन ड्राइव को बूटेबलए

पेन ड्राइव को बूटेबल बनाकर उसके द्वारा हार्ड डिस्क के पार्टीशन बनाने एवं फोर्मेट करके winxp इंस्टाल करने के लिए आप को जिन चीजों की आवश्यकता होगी वो निम्न प्रकार हे | काम आरम्भ करने से पहले ये सारी चीजे आपके पास होनी चाहिए |
१.पेन ड्राइव कम से कम १ GB |
२.winxp की cd जिसके द्वारा आप आज तक winxp इंस्टाल करते आये हे | इस पूरी cd की सारी फाइल्स और फोल्डर को ctrl +A द्वारा सिलेक्ट करके अपने कम्प्यूर में एक फोल्डर बनाकर कोपी कर लीजिये |
३.आप यह सुनिश्चित कर ले की आपके कम्प्यूटर का bios , usb पेन ड्राइव द्वारा बूट होने को support करता हे अथवा नही |
इस कार्य के लिए आपको जिन utilities की आवश्यकता होगी उनको मेने एक फोल्डर में इकठ्ठा करके जिप करके अपलोड कर दिया हे | में लिंक नीचे दे रहा हूँ | आप उसको डाउनलोड कर लीजिये |
http://www.mediafire.com/?sharekey=5…a154af670496da
अब इस डाउनलोड की हुयी फाइल किसी भी ड्राइव में जाकर extract कीजिये | इसको खोलने पर आपको एक फाइल मिलेगी जिसका नाम होगा USB_MultiBoot_10.cmd .आपको केवल इस फाइल पर ही डबल क्लिक करना हे | वास्तव में यह एक बेच फाइल हे जिसमे सारी कमांड्स एक एक करके क्रम में लिखी गयी हे |
एक आवश्यक बात-इस फोल्डर में कई सारी प्रोग्राम फाइल हे उन को डबल क्लिक बिलकुल न करे |

Customize your Start menu

Customize your Start menu

The Start menu is the gateway to your programs, your computer’s settings, and the Internet. Over time, however, the Start menu can get so cluttered that you have to work to find what you need. If you’ve ever stared at your All Programs menu for more than a second trying to find a program, it’s time to organize it.
To make your Start menu more manageable, you can:
• Pin (or attach) commonly used programs to the Start menu
• Reorganize the folders in your All Programs menu
The sections that follow describe each of these techniques. Even if you have just a few minutes to spare, read the first section—it will save you time over the long run.
Pin commonly used programs to the Start menu
If you have a hard time finding applications in your All Programs menu, you can “pin” your favorite applications to the Start menu (you are actually pinning the applications’ icons to the Start menu). This way, they will appear in the Start menu when you click the Start button. Then you can start the application with just two mouse clicks—without opening the All Programs menu.
To pin a program to the Start menu
1. Click the Start button.
Start menu
2. Click All Programs.
All Programs item on Start menu
3. Right-click the program you want to pin to the Start menu, and then click Pin to Start menu.
Program name selected and Pin to Start menu selected
The program appears on the upper-left side of the Start menu. To start the program, click the Start button, and then click the program.
To remove (or unpin) a program icon that you’ve pinned to the Start menu
1. Click the Start button.
Start menu
2. Right-click the program you want to remove from the Start menu, and then click Unpin from Start menu.
Program selected and Unpin from Start menu selected

Work with shortcuts

Work with shortcuts

You can’t be in more than one place at a time, but—with shortcuts—your files can. Shortcuts are links to programs, documents, files, or Web sites that you can add to your desktop or Start menu. Rather than searching through folders or the Internet every time you want to open a particular file or Web site, simply create a shortcut.
You may not know it, but you use shortcuts all the time. When you click the Start menu, every icon you see is a shortcut. The icons on your desktop are also shortcuts. Without these shortcuts (which are created by Windows or the programs you install), you would have to do a lot of extra work every time you wanted to open a program or empty your recycle bin.
You open a shortcut exactly as you would open a file: by double-clicking it. When you open a shortcut, Windows locates and opens the original file. If you delete the shortcut, the original file is still right where it was.
Find out how to:
• Add a shortcut to your desktop.
• Add a shortcut to your Start menu.
• Add a shortcut that links to a Web site.
• Change a shortcut icon.

How to add a shortcut to your

desktop

If you use your desktop frequently, you should consider adding shortcuts to your favorite files to your desktop.
To add a shortcut to a file on your desktop
1. Browse your My Documents folder and subfolders to find the file you want to create a shortcut for.
2. Right-click the file you want to link to from your desktop, click Send To, and then click Desktop.
File shortcut menu with Send To selected and Desktop selected on submenu
Your file stays in the same place, but you now have a shortcut to that file on your desktop. Notice that the icon on your desktop has an arrow in the lower-left corner. This arrow indicates that you are clicking a shortcut and not the actual file.
A shortcut icon on a desktop
If your desktop gets cluttered with too many shortcuts, you can organize and clean up your desktop.
Top of pageTop of page

How to add a shortcut to your Start

menu

In addition to being able to add shortcuts to your desktop, you can also add shortcuts on your Start menu. Shortcuts to your favorite files can appear alongside your programs.
To add a shortcut to your Start menu
1. Browse your My Documents folder and subfolders to find the file you want to create a shortcut for.
2. Drag the file to the Start button and hold it for about one second.
3. When the Start menu opens, drag the file to the location where you want to add it.
4. Drop the file where you want the shortcut, and a shortcut icon appears.
A shortcut being dragged onto the open Start menu

How to add a shortcut to a Web site

In addition to linking to files on your own computer, you can create shortcuts to your favorite Web sites. Double-click the shortcut, and the Web site will open in your browser.
To create a shortcut to a Web site
1. Open the Web site in Microsoft Internet Explorer.
2. Click and drag the Internet Explorer icon in the Address bar (next to the URL) to your desktop or to the Start menu.
Pointer dragging Internet Explorer icon in Address bar
For more detailed instructions, watch the video Creating a desktop shortcut to a Web site.
Watching the video requires that you have Windows Media Player.
Play video Watch the video now.

How to change the icons in your shortcuts

Shortcuts include a picture called an icon, which can help you find a program or file faster. For example, the My Computer shortcut shows a computer icon, and the Recycle Bin shortcut shows a trash can icon.
Examples of shortcut icons
When you change your Windows theme, the new theme might include a set of custom icons that complement the look of the new desktop. For example, a jungle theme might change your My Computer icon to a giraffe. If you want, you can change one or more icons to something more interesting to you.
The method for changing an icon depends on the icon type. You can:
• Change a system icon.
• Change any other icon on your computer.

How to change the theme

How to change the theme

Themes can change every aspect of your computer’s appearance, including colors, sounds, pointers, and the desktop background. To change your theme, first find one that appeals to you. The Microsoft Download Center has many themes, or you can search the Web. To find a theme on a particular topic, search for “Download XP Themes topic.” After you download a theme, just install it as you would any other program.
After you’ve installed a theme, you can change it manually.
To change a theme
1. Right-click your desktop, and then click Properties.
Desktop shortcut menu with Properties selected
2. In the Display Properties dialog box, click the Themes tab. Click the Theme list, and then select the theme you want to use.
Theme drop-down box on the Themes tab in Display Properties dialog box
3. Windows XP shows a preview of the theme. If you like how the preview looks, click OK. Otherwise, click Cancel. Go back to step 2 and choose another theme.
Themes tab in Display Properties dialog box with OK button selected
The new theme takes effect immediately.
Top of pageTop of page

Speed up menu display

Speed up menu display


जानकारी Microsoft द्वारा उपद्ल्ब्ध की गयी है
Windows Xp Tips & Tricks

Speed up menu display

Microsoft Windows XP uses many visual effects to provide a rich, friendly interface. One of these settings allows menus to fade into view when you open them. This visual effect is so smooth that you may never have noticed it; however, the effect does cause menus to take a little longer to appear.
On a fast computer, this shouldn’t be an issue. But on a computer that isn’t responding as quickly as you’d like, you can make menus display faster.
To speed up menu display
1.
Click Start. Right-click My Computer, and then click Properties.
My Computer shortcut menu with Properties selected
2.
Click the Advanced tab. In the Performance area, click Settings.
System Properties dialog box Advanced tab with Settings button selected
3.
On the Visual Effects tab in the Performance Options dialog box, clear the Fade or slide menus into view check box.
Visual Effects tab in Performance Options dialog box with Fade or slide menus into view selected
4.
Click OK.
5.
In the System Properties dialog box, click OK.
Advanced tab in System Properties dialog box with OK selected
Now when you click a menu, it will appear almost instantly.
Set your windows so they all have the same view
Published: September 7, 2006
Microsoft Windows XP lets you show the contents of folders in a variety of ways, such as a simple or detailed list of the files, or as thumbnail images. Each folder in My Computer or My Documents can have its own view. That’s useful for folders like My Music or My Pictures, because you can look at your digital photos in Thumbnails or Filmstrip view, and see your song titles in Tiles view. But changing the view for every folder can be time-consuming.
If you prefer to have all your folder contents displayed in a particular way, you can save yourself some time by changing the view for all the folders on your computer at once.
To set your windows so they all have the same view
1. Click Start, and then click My Documents.
Start menu with My Documents selected
2. Click the Views button, and then click the view you want to apply to all folders.
Note: For more information about views, read Specify how folders open.
My Documents window with Views menu displayed
3. Click Tools, and then click Folder Options.
Tools menu with Folder Options selected
4. Click the View tab, and then click Apply to All Folders.
View tab in Folder Options window
5. Click Yes.
Folder views dialog box
6. Click OK.
View tab in Folder Options window with OK button selected
The next time you open a folder, it will be displayed using the view you chose. To restore your original folder settings, repeat steps 1-3. Then, in step 4, click Reset All Folders.
If all the walls in your home are white, stop reading. If you’ve never accessorized an outfit, customized your car, or pierced your body, this article isn’t for you. But if you like adjusting your environment to fit your mood and sense of style, you’ll likely enjoy the number of ways Microsoft Windows XP lets you change the look of your operating system.
You can change everything at once by choosing a theme. There are themes for hundreds of movies, TV shows, sports teams, games, cars, musicians, and anything else people get enthusiastic about. Or you can totally customize the appearance of Windows XP by tuning individual settings.

Shutdown XP Faster

Change the picture on your Welcome screen

By default, each user account in Microsoft Windows XP has a standard picture (such as a chessset, a dog, or an astronaut) associated with it. If you’d like to make the picture more personal, you can add your own image for each account. Changing pictures is fun, and it makes it easier for young children to use your computer. To change the picture on the Welcome screen 
1. Log on to your computer as an administrator. 
2. Click Start, and then click Control Panel. Start menu with Control Panel selected
3. Under Pick a category, click User Accounts. Control Panel window with User Accounts selected 
4. Under or pick an account to change, click the account you want to choose a picture for. User Accounts window with account selected 
5. Under What do you want to change…, click Change the picture. User Accounts window with Change the picture selected 
6. Click Browse for more pictures. User Accounts window Pick a new picture page with Browse for more
pictures selected 
7. Click the picture you want to display for that account, and then click Open.Browsing My Pictures folder with image and Open button selected Windows XP displays the picture on the Welcome screen for the
account you selected. To choose pictures for other accounts, return to step 3. Type without using the keyboard (On-Screen Keyboard) Instead of relying on the physical keyboard to type and enter data,
you can use On-Screen Keyboard. On-Screen Keyboard displays a visual keyboard with all the
standard keys. You can select keys using the mouse or another pointing device, or you can use a
single key or group of keys to cycle through the keys on the screen. * Open On-Screen Keyboard by
clicking the Start button Picture of the Start button, clicking All Programs, clicking Accessories, clicking Ease of Access, and then clicking On-Screen Keyboard. Select a layout for On-Screen Keyboard You can adjust the layout, alignment, or number of keys that appear on On-Screen Keyboard. Show all To change the
keyboard layout You can display On-Screen Keyboard in two different views (Standard Keyboard
or Enhanced Keyboard) to promote faster typing or maximize thenumber of available keys. 
1. Open On-Screen Keyboard by clicking the Start button Picture of the Startbutton, clicking All Programs,
clicking Accessories, clicking Ease of Access, and then clickingOn-Screen Keyboard. 
2. Click Keyboard, and then select Enhanced Keyboard or StandardKeyboard. To organize keys either
in rows or like a keyboard Block layout displays the keys in verticaland horizontal rows, which can
make selecting the keys easier. Regular layout displays the keys in overlapping rows, simulating a physical keyboard. 
1. Open On-Screen Keyboard by clicking the Start button Picture of the Start button, clicking All Programs, clicking Accessories, clicking Ease of Access, and then clicking
On-Screen Keyboard.
2. Click Keyboard, and then select Regular Layout or Block Layout. Change how information is entered into
On-Screen Keyboard There are three ways to enter data in On-Screen Keyboard: 
o Clicking mode. In clicking mode, you click the on-screen keys to type text. oHovering mode. In hovering mode, you use a mouse or joystick to point to a key for a predefined period of time, and the selected character is typed automatically. 
o Scanning mode. In scanning mode, On-Screen Keyboard continually scans the keyboard and highlights
areas where you can type keyboard characters by pressing a hot key or using a switch-input device. Use
scanning mode to select keys with a single button or key. Change the font for On-Screen Keyboard keys
On-Screen Keyboard might be easier to use if you change the font used to illustrate the keys on the
screen. The fonts that most people find easiest to see on the screen areVerdana and Arial. 
1. Open On-Screen Keyboard by clicking the Start button Picture of the Start button, clicking All Programs,
clicking Accessories, clicking Ease of Access, and then clicking On-Screen Keyboard. 
2. Click the Settings menu, and then click Font.
3. In the Font box, select a font, and then click OK. Set On-Screen Keyboard to use audible clicks You can have On-Screen Keyboard make an audible click when a key is pressed. 
1. Open On-Screen Keyboard by clicking the Start button Picture of the Start button, clicking All Programs, clicking Accessories, clicking Ease of Access, and then clicking On-Screen Keyboard. 
2. Click Settings, and then select Use Click Sound to hear clicks when you select keys using On-Screen
Keyboard.
 

5-hard-drive-formatting-and-partitioning-utilities

5-hard-drive-formatting-and-partitioning-utilities

Formatting hard drives and external hard drives is usually a fairly straightforward process. The two most popular operating systems, Windows and Mac OS both have formatting utilities built-in, which makes formatting external drives even more convenient. However, with all of the different drive manufacturers, interfaces and other compatibility and formatting issues that hard drives can have, sometimes the best choice is to use specialty formatting apps and utilities.
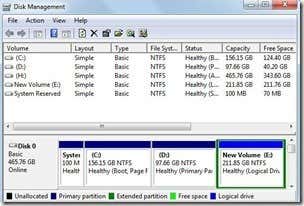
windows_disk_management
The Windows Disk Management function, pictured above, allows Windows users to simply format and partition external drives. However, there are times when it simply doesn’t cooperate very well. For example, the drive that you are trying to select for formatting may not be recognized by the utility, or it may be greyed out and not clickable.
If you are unable to get a hard drive formatted or partitioned correctly using the built-in apps that are offered by Microsoft and Apple, then your next step may be to try and format the drive directly, using command line. If you’re comfortable using command line, then you may want to check out our guide on how to format external hard drives to FAT32.
Additionally, your computer may not recognize the external hard drive whatsoever. If this is happening, this guide may be useful.
In those cases where a hard drive is simply not formatting, partitioning, etc… you may want to consider using a specialty hard drive formatting utility, which will often times make things simpler. In many cases, these utilities are often more effective than the built-in options that Windows and OS X offer as well.

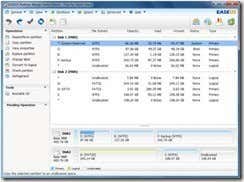
EaseUS Partition Master Home Edition

If you need to manage partitions, copy partitions or even create boot disks, EaseUS Partition Master Home Edition is an excellent utility that can handle all of that and more.
Currently one of the highest ranked hard drive utilities on download.com, this lightweight Windows app is a bit more intuitive than the built-in Windows Disk Management function, offering several additional options and features.
EaseUS Partition Master

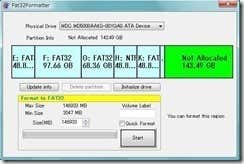
Tokiwa Fat32Formatter

If your objective is to format a hard drive to FAT32, then you may want to give Tokiwa Fat32Formatter a try. This utility was actually recommended by several of our site visitors in the comments section of one of our more popular posts. Several site visitors have noted that this utility has been successful at partitioning to FAT32, when other programs would not work or not recognize the drive.
Fat32Formatter

Western Digital Align

For more advanced disk formatting options, particularly with Western Digital brand external hard drives, you may want to use the WD Align software for drives that aren’t formatting using Windows built-in options. Most of the advanced features and formatting options with Align revolve around optimizing the drive for speed and compatibility with newer operating systems.
WD Align

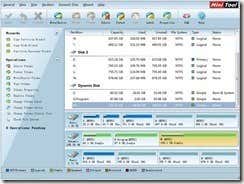
Partition Wizard

Partition Wizard is a freeware disk partitioning and formatting utility that is simple to use and effective. The interface is quite straightforward and the software is excellent at making complex formatting options simple.
Partition Wizard

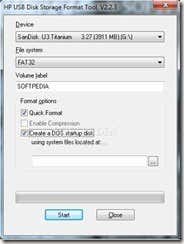
HP Disk Storage Format Utility

While the other software on this list focus specifically on external hard drive formatting, the HP Disk Storage Formatter specializes in USB devices such as flash drives. This ultra simple formatting utility has just a few options, but it is effective and has received some great reviews.
HP Formatter Utility
Overall, the formatting utilities that are offered by Windows and OS X will format hard drives, but there may be cases when they will fail to format a hard drive correctly. The next option is to use command line, but that’s more complex and not for everyone. Using the variety of hard drive formatting and partitioning utilities featured in this post, you should have no problems getting hard drives or even USB flash drives formatted correctly. Thank you for stopping by the site for today’s post.

speed-up-mozilla-firefox

speed-up-mozilla-firefox


lowFirefox-Itis. n. The thing that happens to Firefox over time. Symptoms include decline in speed and efficiency.
So, you’ve turned on your computer, clicked on Mozilla Firefox, and then….you waited. “Why,” you say, “Is firefox slower now?”
Well, we’re here to fix that problem! Whether it’s just because you want to make Firefox faster than it already is (which is wickedly fast anyway), or because you want to fix your declining speed, you’ve come to the right place.
Please note that if you do not have firefox as your default browser, I advise you to get it immediately. It is faster and more efficient than every browser out there. It is obtainable at mozilla.org/firefox.
If you use all the methods put together, you should be able to see a speed increase of at least 50% on Firefox.
Method 1:
Okay, well. To begin with, I will tell you how to increase your bandwidth speed by 20%.
Windows actually reserves 20% of your bandwidth for purposes I will never know. I’ll show you in a few easy steps, how to reclaim it.
Step 1:
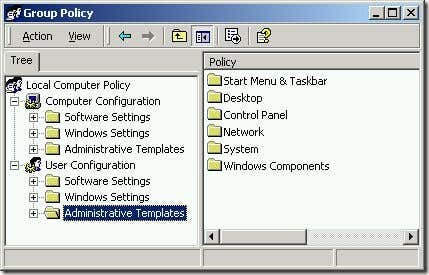
Click “Start“, and go on “Run“, and type in “gpedit.msc“. You should see this:
gpeditmsc
Step 2: You should see a thing called ‘Group Policy’ open.
Step 3: Double-Click on “Computer Configuration”.
Step 4: Double-Click on “Administrative Templates”
Step 5: Double-Click on “Network”
Step 6: Double-Click on “QOS Packet Scheduler”
Step 7: Double-Click on “Limit Reservable Bandwidth”
Step 8: Check the box that says ‘Enabled’ and change Bandwidth Limit (%) to 0.
You got 20% increase on your bandwidth speed! Easy, was it not?
Method 2:
The next way is to modify the amount of requests can accept at once. By changing it to a very high number (30+), you should see a massive rise in speed.
So, to this, I’ll put it in a few easy to follow steps.
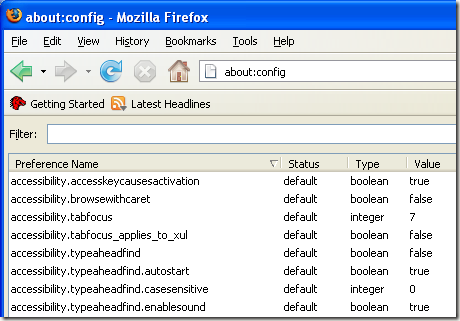
Step 1: Load up Mozilla Firefox. Now, in the address bar, type “about:config” (Without the ” ” of course). You should see this:
aboutconfig-addressbar
Step 2: Scroll down the page until you find browser.tabs.showSingleWindowModePrefs, and then double-click it. This will set it to “True”.
Step 3: Next, scroll down look for the line that says network.http.pipelining, and double-click this. This will set this to “True”.
Step 4: Now, scroll down and look for network.http.pipelining.maxrequests. Once you have done this, double-click it, and a box will pop up. Change the number to 60.
Close Firefox. You will now experience a 10% to 40% increase in speed.
Method 3:
Finally, the last way to increase your speed, is by using an add-on for Firefox, called FasterFox. It’s increased my speed greatly. Although, my friend, who owns a weak computer, said it doesn’t work well for him, so if your computer is weak, you may want to stop here.
FasterFox basically increases your speed by recycling all the idle bandwidth not doing anything, and makes it load your pages faster.
fasterfox2
You can get FasterFox at http://fasterfox.mozdev.org/.
Install it, and your done! Hopefully, you now have a faster running Firefox! Any other ideas, post a comment!
This is a guest post by Anthony Duong, a tech enthusiant.